Sending Email Notifications
platformOS offers an easy way of sending emails that could be used, for example, as notifications about a change in the application.
Tip
You can check out the final code for this tutorial in a separate branch on GitHub
Enabling emails on the staging instance
Note
On staging instances, email delivery is restricted to prevent accidental emails from being sent to real users. Emails can only be sent to the test email address configured in the Partner Portal. Any email sent from staging will only be delivered to the test email set in the instance configuration.
Before sending emails from a free staging instance, you need to configure a test email address. This step is not required on production instances, but staging environments only allow sending emails to preset addresses for testing. The emails sent from those instances will always be redirected to the test addresses.
To set the test email, log in to the Partner Portal and choose the instance from the Instances list.
Click on the Update Configuration button, then click on Switching to edit mode. Provide your credentials if asked (email address and password), then edit the desired values.
Look for a section of the configuration called attributes and change the value of the test_email. It needs to be set to the test email address to which all the emails for the instance will be sent to:
[...]
"attributes": {
  "test_email": "[email protected]",
  [...]
},
[...]
Remember to save the updates by clicking the Update Instance configuration button.
How staging modifies email recipients
When testing emails on a staging instance, the system makes a few adjustments to ensure emails don’t accidentally reach real users. Instead, all emails are sent to the test email address set in the instance configuration.
For example, if you send an email with these details:
to: "[email protected]"
cc: "[email protected]"
bcc: "[email protected]"
subject: "New item on the To Do list"
On staging, the email is modified like this:
to: "[email protected]"
cc: nil
bcc: nil
subject: "(to: [email protected], cc: [email protected], bcc: [email protected]) - New item on the To Do list"
This means, the email is sent only to the test email address. The original to, cc, and bcc values are removed, and the original recipients are moved into the subject line for debugging.
Creating a layout for the emails
platformOS treats emails similarly to standard HTML pages. You can create a separate layout for the emails and use Liquid to pass any data to it. Start by creating the layout.
Assuming, for the purpose of this tutorial, that you would like an independent HTML structure for all of your emails, you can create a new layout in the app/views/layouts/ folder, in a file called mailer.liquid. The name can be anything you want.
app/views/layouts/mailer.liquid
<!DOCTYPE html>
<html>
  <head>
    <meta charset="utf-8">

    <style>
      h1 {
        text-align: center;
      }

      a {
        color: #1b8816;
      }
    </style>
  </head>
  <body>
    <h1>Your <em>To do</em> list has an update!</h1>

    {{ content_for_layout }}
  </body>
</html>
The {{ content_for_layout }} is a Liquid variable that will be replaced by the actual email content you’ll define in other .liquid files.
If you ever styled an email, you know how many limitations the CSS for emails has. One of the rules to follow is that it’s safest to place the styles inline with the help of the style attribute. platformOS makes this easy: whatever styles you’ll include in the layout will be automatically converted to inline styles. In the case above, the <h1> will become <h1 style="text-align: center;">.
For your To Do app, add an email notification when you add a new item on the list. The content of email messages should be kept in the app/emails/ folder. To follow the pattern you established in this tutorial you’re going to create the file as app/emails/item/created.liquid:
app/emails/item/created.liquid
---
from: "[email protected]"
to: "[email protected]"
subject: "New item on the To Do list"
layout: mailer
---

A new item has been created: {{ data.title }}
The topmost part of the code, between the dashed lines (---) is the page configuration section. These are internal information passed to the platform to describe the page behavior or pass additional metadata.
For the email page, you need to configure the recipient email address (to:), the sender (from:), and the subject of the message.
You’ve created a new layout file specifically for this occasion, so line 5 tells the platform to use the file stored in app/views/layouts/mailer.liquid as a scaffolding for the email content.
The last line is just the content of the email you’re going to send. Since you would like to pass the title of the item added to the list, you output the content of data.title. The data will be the name of the variable you are going to use in the GraphQL mutation that will trigger sending the email.
Using GraphQL to send an email
To actually send an email through the platform you need to trigger it via GraphQL. To make it as simple as you can, create a new file under app/graphql/item/email/created.graphql that will handle sending the email after you create a new item in the database:
app/graphql/item/email/created.graphql
mutation email_item_created(
  $data: HashObject!
) {
  email_send(
    template: { name: "item/created" }
    data: $data
  ) {
    is_scheduled_to_send
    errors { message }
  }
}
In line 1, you define a new mutation – which is a GraphQL name for any operation that modifies or creates data. The name of the mutation is just there for your convenience.
In line 2, you define a variable called data. In GraphQL, the variable name is prefixed with a dollar sign ($). This will be the variable with all of the information you want to send in the email, so to handle all of that data you need it to be a hash (also called an object in other programming languages). The exclamation mark (!) in the end means that this variable is required for the mutation to run.
In line 4, you use a function that will send the email using the Liquid template that you created in the previous steps of this tutorial (line 5). In line 6, you pass the data variable to this template. If you’ll check the app/emails/item/created.liquid file you will notice that this data hash is used to output the title in the email’s content.
Starting from line 8, you define what you would like to get returned after the mutation will do its thing. The is_scheduled_to_send is a boolean that will tell you if everything went right (when true) and the email is added to the queue and will be sent. Alternatively, if something went wrong, you will have the error message returned, as defined in line 9.
Trigger sending the email
When you have enabled emails on staging, created the HTML for the emails and prepared the mutation, the only thing left to do is to run the mutation when needed using Liquid.
{% liquid
graphql email = 'item/email/created', data: <hash>
%}
This line runs the mutation saved in app/graphql/item/email/created.graphql. There's no need to pass the whole path to the file as the platform knows where to look for GraphQL files. You are also passing to it a single variable called data that you will use to assign the hash with the information needed for sending the email.
If you are following this tutorial and building the To Do app, then you probably would like to send the email after a new item has been added to the list.
Since you have a separate page that handles this (app\views\pages\item\create.liquid), you can just plug into the right place and trigger the GraphQL mutation after the new item was successfully saved in the database:
app/views/pages/item/create.liquid
---
method: post
---


{% liquid
	graphql result = 'item/create', title: context.params.title

	if result.record.id
		graphql email = 'item/email/created', data: context.params
		redirect_to '/'
	else
		echo 'Something went wrong'
		echo result.errors
	endif
%}
In line 10, you trigger the GraphQL created for sending emails, but only if the record was added successfully.
You also pass the whole context.params hash as your data variable. This way every <form> element value will be passed to the GraphQL mutation, including the title that you are sending in the email.
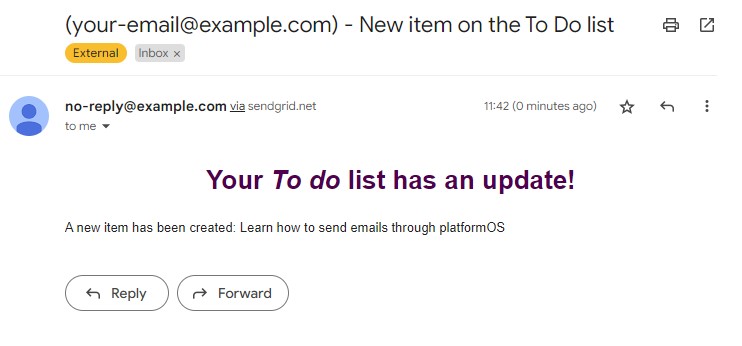
When you have everything configured and ready, you should see an email sent to the address you’ve provided in the configuration on the Partner Portal.
Sending emails to addresses provided dynamically
In the app/emails/item/created.liquid you’ve hardcoded the to: address, but in real life you will probably want to insert any address passed as a variable. For example when you’ll implement any form of user accounts and would like to send the emails to the owner of that account.
Tip
Please remember that on the free Staging environment emails can only be sent to the test email address. To send emails to other addresses you will have to sign up for the Production environment.
It is totally possible to use a variable in the configuration section of a page. As an example, in app/emails/item/created.liquid you could use {{ data.recipient }}:
app/emails/item/created.liquid
---
from: "[email protected]"
to: "{{ data.recipient }}"
subject: "New item on the To Do list"
layout: mailer
---
Notice that the Liquid variable is surrounded with quotation marks.
This would also mean that you need to pass the recipient variable to your GraphQL mutation. Since you are passing the whole context.params as described above, you could use a hidden form element in the <form>:
app/views/pages/index.liquid
<!-- form for adding new item -->
<form action="/item/create" method="post">
+ <input type="hidden" name="recipient" value="[email protected]">
  <input type="text" name="title">
  <button type="submit">Add item</button>
</form>