Development Workflow
A development workflow is the process you follow during development to save time and minimize errors. It includes stages like setup (scaffolding), development, testing, integration, optimization, and deployment.
Setup
The setup process of developing a site using platformOS includes three main steps:
1. Create a new Instance on the Partner Portal
The Partner Portal is an online interface where you can create, manage, and configure sites built with platformOS, and manage other users of the Partner Portal. The site created on the Partner Portal will be the site you deploy and sync your changes to during development.
- The sites created are called Instances. Instances have a URL, and they represent different environments, like staging or production.
- Users of the Partner Portal are called Partners. Partners have the permissions to create, manage, and configure Instances. Partners can also create and manage other Partners.
When you create an Instance, the platformOS engine saves the Instance, which – after authorization – becomes available for you to deploy and sync to.
What you’ll need:
2. Create codebase
In order to correctly communicate with the platformOS engine and API, your codebase should be organized into a specific directory structure. To create your codebase in a local environment follow the steps in the Working with the Code and Files topic.
What you’ll need:
3. Setup pos-cli
The pos-cli is a command line interface that helps you deploy configuration files and assets to your platformOS site. It also allows you to use team collaboration tools like git in your workflow.
You can use the pos-cli to deploy or sync your codebase to the Instance as described in the Working with the Code and Files tutorial.
What you’ll need:
4. Setup IDE - for platformos-check
The platformos-check is a Node.js-based tool that helps you follow platformOS recommendations & best practices by analyzing the Liquid inside your app. It is part of the platformos-tools monorepo.
What you’ll need:
- Install pos-cli via npm:
npm install -g @platformos/pos-cli— platformOS Check and the Language Server are bundled with pos-cli - If you use VSCode - platformOS Liquid Extension
- The extension works on all platforms (Windows, macOS, Linux) — no additional dependencies required
- If you use Vim, Emacs or anything else
- platformOS check includes a Language Server Protocol implementation via
pos-cli lsp. Follow instructions of how to use LSP servers in your editor. For example, for Vim you can use coc.vim and configure it:{ "languageserver": { "platformos-check": { "command": "pos-cli", "args": ["lsp"], "filetypes": ["liquid", "graphql", "yaml", "yml"], "rootPatterns": [".platformos-check.yml", ".pos"], "settings": { "platformosCheck": { "checkOnSave": true, "checkEnter": true, "onlySingleFileChecks": true, "checkOnChange": true, "checkOnOpen": true } } } } }
- platformOS check includes a Language Server Protocol implementation via
Please note that pos-cli check run is available as a CLI tool for linting, which is capable of auto-correcting some of the offenses, and can be used in CI. Use pos-cli check init to initialize a .platformos-check.yml configuration file. Learn more about platformOS check Configuration
5. Setup IDE - for GraphQL
To work efficiently with GraphQL in platformOS, it's recommended to use an IDE that supports GraphQL autocomplete, syntax highlighting, and other features. One popular choice is the GraphQL extension for VSCode.
What you’ll typically need:
-
platformOS Schema:
You’ll need to download and place the platformOSschema.graphqlfile in your project’s root directory. This file contains all the GraphQL types, queries, and mutations available in platformOS, allowing your IDE to provide accurate autocompletion and validation. -
GraphQL Configuration File:
In your project, create a.graphqlrc.ymlconfiguration file. This file tells your IDE where to find the schema and how to handle GraphQL documents.Here's an example configuration that works with most GraphQL extensions:
schema: 'schema.graphql'
extensions:
  languageService:
    cacheSchemaFileForLookup: true
documents: ['**/*.{graphql}']
Note
While the above configuration should work for most cases, always check the specific instructions for the GraphQL extension you are using. Each extension may have additional features or configurations you can leverage for better performance and ease of use. We also recommend regularly updating your schema.graphql file to ensure you have the latest features and queries available in platformOS.
Development
Development Instances
Development Instances are used for developing, updating, and testing a site without risking the integrity of the live site.
You can set up different types of Instances (staging/production) through the Partner Portal.
- Local codebase: You develop your site (write code) in your codebase in your local environment.
- Staging Instance: The staging Instance can be used for testing, presenting the changes to the client for approval, QA (Quality Assurance), or UAT (User Acceptance Testing).
- Production Instance: The production Instance is the live site available to visitors.
Based on the project’s size, scope, or requirements, stages from the above workflow can be removed, or additional stages can be added. For example, a testing site before staging can be added to separate testing from QA and UAT.
Development Workflow
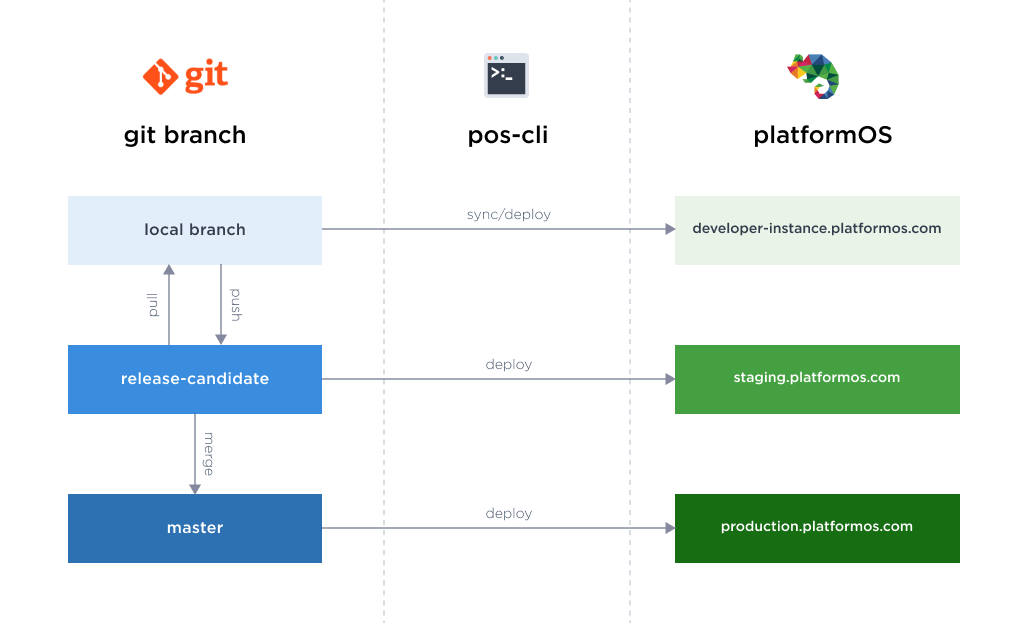
You develop your site (write code) in your codebase in your local environment. By syncing to your developer Instance you check your changes in real time. The pos-cli sync command enables sync mode: it keeps track of changes on your local environment, and sends files that have been changed to the server. It only sends files that have changed after sync was started. It feels like working on localhost. It is recommended to use sync only for staging environments, as pushing changes immediately to production can be dangerous.
Once you have a release candidate, you can deploy it to your staging site. You can use the staging site for testing, review, QA, or UAT.
If everything works as expected on staging, you can deploy your changes to your production site, your live site accessible to visitors.
It is recommended that all developers have their own development instance, similarly to how they have their local versions. You keep source code in Git. Only production ready code goes into the master branch and you deploy the code from master to production.
This is a diagram of our recommended development workflow:
Learn more about QA, testing, the DevOps concept, and Continuous Integration and Delivery in our QA Best Practices section.